
Hide
Hide
Creating WYSIWYG Tables
hide
Hide
When creating transcriptions of old documents (e.g. Gazetteers), there is often a need to create multiple simple tables to replicate tables or diagrams contained in the original document.
GENUKI provides in its Drupal editing suite the facility to prepare and edit WYSIWYG tables.
However this WYSIWYG approach is not quite as intuitive as it might seem or be desired. It is not possible to cut, copy and/or paste a table using the WYSIWYG editor (cut, copy and/or paste has to be done instead by identifying and selecting the table’s html code whilst in “Disable rich text” mode).
The following practical guidance is offered to the user to facilitate and speed their work.
Creating New Tables in Drupal
GENUKI’s implementation of Drupal generates its output in HTML5. In HTML5, almost all table styling is done using Cascading Style Sheets (CSS), thus older pre-HTML5 tags will not work properly and will generate html syntax errors.
GENUKI currently offers two CSS styles for tables, gki_tbl_border (a basic table, with table outline and internal cell borders), and gki_tbl (a similar style that does not show table outline or cell borders). There is also a third CSS class, gki_tbl_centre, that should additionally be used for centering a table on a page.
Most tables currently in Drupal will have come from previous implementations of the page in HTML4.01, HTML4, XHTML, or similar, as part of the GENUKI conversion process. The extent to which these work as originally described is a little unclear, but most seem to display adequately. Few have been pro-actively converted to the HTML5 styles by the maintainer.
So here we will address the creation of new tables: typically small data tables arising from new transcriptions (e.g. in Gazetteers), and large data tables containing considerable genealogical material (e.g. indexes and genealogical records).
| Table Type | Typical Nature |
| Small data tables arising from new transcriptions (e.g.tables or diagrams in Gazetteers) |
Typically small, usually less than 10 rows high, and 6 or 7 columns wide, usually centred within the page, and typically 50, 80, or 90% of the page width. |
|
Large data tables containing considerable genealogical material (e.g. indexes and genealogical records transcriptions)
|
Typically large, and left-aligned, possibly extending beyond the width of the screen.
|
| Preformatted text |
Preformatted index or similar material can be pasted directly into a single-cell table, centred if necessary. e.g. <pre> Text in a pre element is displayed in a fixed-width font (usually Courier), and it preserves both spaces and line breaks. </pre> |
To create a new table, open the page for editing then scroll to the "Body" edit pane. ensuring the pane is in Rich-text mode. Then position the cursor in the desired location in the Edit Pane, then click the "Table" icon:
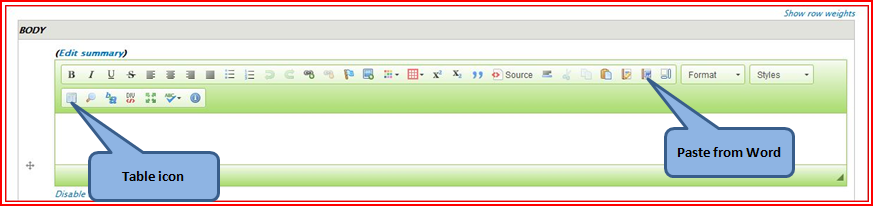
Plain Page Edit Pane
Showing "Table" and "Paste from Word" icons
The "Table Properties" dialogue box opens in the Table Properties tab:
In this first example, using the formatting boxes and the drop-down menus, we set a 3 row x 2 column table that is aligned page-left, with borders, and width 90%.
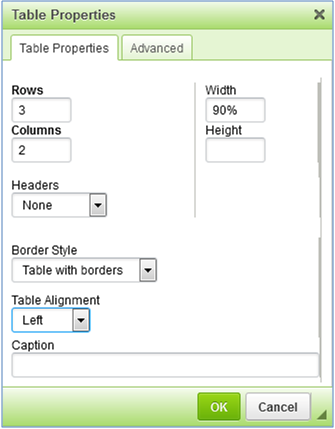
Table Properties Tab
Clicking the "Advanced" tab opens the Advanced tab, where we see that the appropriate CSS styles have been selected.
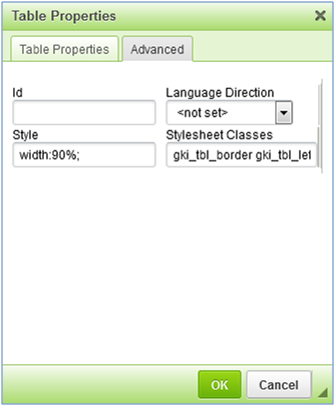
Advanced Tab
In this second example, using the formatting boxes and the drop-down menus, we set a 3 row x 2 column table that is centred in the page, without borders, and width 90%.
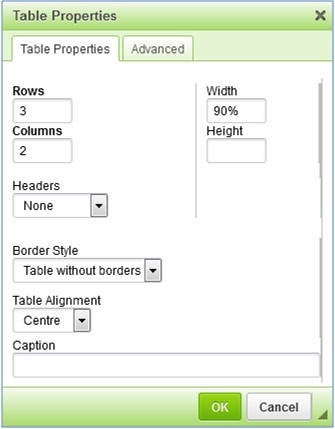
Table Properties Tab
Clicking the "Advanced" tab opens the Advanced tab, where again we see that the appropriate CSS styles have been selected.
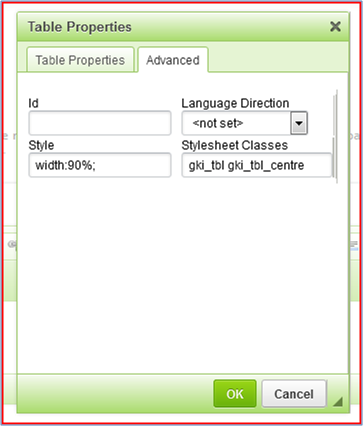
Advanced Tab
For a basic table with an outline and showing cell boundaries, select "Table with borders" in the “ “Alignment” box in the “Table Properties” tab in “Table Properties” dialogue box. The selected style (the table style “gki_tbl_border”) will appear in the "Stylesheet Classes” box in the "Advanced" tab.
For a plain table with no outline or cell boundaries, select "Table without borders" in the “ “Alignment” box in the “Table Properties” tab in “Table Properties” dialogue box. The selected style (the table style “gki_tbl”) will appear in the "Stylesheet Classes” box in the "Advanced" tab.
The table can also be centred on the page by using the third CSS class "gki_tbl_centre" in addition to either of the CSS classes described above. For example, if the table is to have border and be centred on the page, then selecting these in the dropdown menus will result in "gki_tbl_border gki_tbl_centre" appearing in the “Stylesheet Classes” box in the “Advanced” tab in “Table Properties” dialogue box.
In HTML 4.01 terms this is equivalent to <table class="gki_tbl_border gki_tbl_centre">.
Once a table has been created, the “Table Properties” dialogue box can be accessed at any time by right-clicking on the table.
(Note: The 3 CSS classes (gki_tbl, gki_tbl_border, gki_tbl_centre) defined for the formatting of tables should now be used for all tables in Genuki. The original CSS classes (gki_plain_table, gki_basic_table) should no longer be used, and have now been deleted now that all existing pages using them have been converted to the new CSS classes).
Formatting the New Table
Intuitively, to create a new table representing an original printed version which is 5 columns wide x 6 rows high, one would create a table of 5 x 6 cells. However in practice it is better to create one of 5 x 2 cells, with each column containing its header text in row 1, and all of its data text in row 2, as this looks better, is more compact and takes up less space on the screen.
So, to replicate a table that is originally of 5 columns wide x 6 rows high, position the cursor at the point of insertion (see TIPS), and click the ‘Table’ icon in the menu bar.
In the Table Properties dialogue box which appears, on the Table Properties tab set a table size of 5 columns and 2 rows.
- Set the Width to the desired size in percentage or pixels, if necessary.
- Set the Alignment - Centre; this will centre the whole table on the page (The table does not move whilst on the edit page).
Leave the other settings unchanged, as the defaults, typically:
- Headers – None;
- Border size - blank;
- Height, Cell spacing and Cell padding - all blank;
- Caption - insert a caption if desired (final appearance is better if suffixed by the "Enter" or "Shift+Enter" key). This appears above the table. Can be made bold later.
- Summary - the summary of the table contents that is available for assistive devices such as screen readers. It is a good practice to provide your tables with meaningful summary text in order to make it more accessible to users with disabilities.
On the Advanced tab, set the Stylesheet Classes, e.g. gki_tbl_border gki_tbl_centre (grid) or gki_tbl gki_tbl_centre (no grid) as desired.
- Id – leave as the default, blank;
- Language Direction – leave as the default, not set;
- Style - set the desired size in percentage or pixels, if necessary (or it will follow the width which was set on the "Table Properties" tab).
Then select the entire table and click the ‘Centre’ icon in the menu bar This will centre the whole table on the page (The table does not move whilst on the edit page).
Now populate the individual cells. It is also possible to paste complete data sets per cell, each created separately, e.g. in Notepad; it is similarly possible to create the content directly in the underlying HTML.
If necessary, then select individual rows, columns and/or cells and set the text alignment as desired, see formatting facilities as mentioned under Subsequent Configuration below.
Save the page, the table should now appear as desired.
Subsequent Configuration:
Once a table has been created, if you position the cursor on the right hand edge of the table you can adjust the width of the table. Similarly you can position it on a column boundary to adjust the position of this boundary. If you position the cursor inside the table and do a right-click a small window opens up that provides you with a hierchical menu providing a rich set of formatting facilities e.g. for inserting, merging or deleting cells, rows or columns, and for configuring cell size, type, colour, and content alignment.
Copying or Moving a Table
It is not possible to cut, copy and/or paste a table using the WYSIWYG editor.
Cut, copy and/or paste has to be done instead by identifying, selecting and copying the table’s html code whilst in “Disable rich text” mode.
Then, again whilst in “Disable rich text” mode, paste the html text in the position desired.
Pasting from Excel
Tables (non-WYSIWYG) can also be pasted directly from Excel, although only the cell content (not borders or colours) survives. Copious html syntax errors are generated.
Once such a table has been selected (right-click) the table properties can be amended, but not suprisingly only the positioning (e.g. centre in page) has been shown to take effect.
Long-term use is deprecated - although in the short term it may be useful as an editing aid whilst creating new tables in the WYSIWYG editor.
Likewise, the temporary pasting of images may also be useful in this context, before the pages are published. Be aware of copyright issues.
See the example Excel worksheet for assistance in managing this. (Further investigation is ongoing.)